Dealing with damaged plaster is a common challenge for many property owners. Whether it’s an old home with traditional lime-based plaster or a modern building with gypsum plaster walls, the need for repair can arise from various causes such as water damage, structural shifts, or simple wear and tear over time. Understanding how to effectively repair plaster is not just about maintaining the appearance of your property; it’s about preserving its structural integrity and ensuring a healthy living environment. This guide aims to equip you with the knowledge and techniques needed to tackle plaster repairs confidently. From assessing the extent of the damage to applying the finishing touches, we’ll walk you through each step of the process. Repairing plaster may seem difficult at first, but with the right approach, it can be a straightforward and simple task. By learning how to fix damaged plaster, you’re not just patching up walls; you’re taking an active role in the care and maintenance of your property, enhancing its longevity and aesthetic appeal.
So, let’s dive into the world of plaster repair and discover how you can restore your walls to their former beauty with a few simple tools and techniques.
Assessing the Damage
Identifying the Type of Plaster
In the Australian market, two primary types of plaster are prevalent: gypsum-based and lime-based. Gypsum plaster, often used in modern construction, is known for its quick setting times and ease of application, making it a popular choice for interior walls and ceilings. Lime plaster, on the other hand, has a historical presence in older Australian homes. It’s valued for its breathability and flexibility, which makes it suitable for buildings that need to manage moisture without trapping it within walls. Identifying whether your home features gypsum or lime plaster is crucial for effective repair, as each material requires a different approach. Gypsum demands a smooth, quick fix, whereas lime plaster repairs are more about patience and allowing the material to cure naturally over time.
Determining the Extent of Damage
Before embarking on any repair work, it’s essential to thoroughly assess the extent of the damage to your plaster. This step is crucial as it dictates the repair strategy and materials needed. Start by visually inspecting the plaster for visible signs of damage such as cracks, holes, or areas where the plaster has detached from the underlying lath (in older homes) or the wall surface. For smaller cracks or holes, a simple fill-and-paint approach may suffice. However, larger cracks, bulging, or areas where the plaster feels loose to the touch could indicate more significant underlying issues, such as structural movement or moisture intrusion.
Use a gentle tap test over the surface areas; a hollow sound can reveal detached or compromised plaster that isn’t immediately visible. Moisture meters can be instrumental in detecting hidden dampness within the plaster, a common problem in Australian homes that can lead to mould and further plaster degradation. It’s also wise to look for staining or discoloration, which often accompanies water damage. Understanding the full scope of damage enables homeowners to prepare adequately, ensuring all necessary repairs are addressed in one go, preventing piecemeal fixes and ensuring a more durable and aesthetically pleasing repair.
Preparing for Repair
Gathering Materials
Before diving into the repair work, it’s crucial to have all the necessary materials and tools at hand to ensure the process runs smoothly and efficiently. Whether you’re dealing with gypsum or lime plaster, the right supplies can make all the difference. Here’s what you’ll need:
- Plaster Mix or Patching Compound: Choose according to the type of plaster your wall is made from.
- Sandpaper: Have a variety of grits for smoothing the repaired surface.
- Dust Mask: Essential for protecting yourself from fine particulate matter.
- Trowel: Needed for applying the plaster to the wall.
- Putty Knife: Useful for finer, detailed repair work.
- Drop Cloths or Plastic Sheeting: Protects your floors and furniture from dust and debris.
- Painter’s Tape: Helps secure drop cloths and mark off the repair area.
- Mixing Bucket and Water: For preparing the plaster mix.
- Primer and Paint: If the repaired area requires painting to match the surrounding surfaces.
Equipping yourself with these tools and materials will set the stage for a successful plaster repair, ensuring everything is within reach for a seamless restoration process.
Preparing the Area
Proper preparation of the area is essential for a clean and efficient repair process. Start by removing all furniture and decorations from the vicinity to prevent any damage. If moving everything out isn’t feasible, shift items to the center of the room and cover them with drop cloths or plastic sheeting. Use painter’s tape to secure the sheeting and to mark off the repair area, protecting adjacent surfaces from plaster splatter and dust. Ensure good ventilation by opening windows or using fans to circulate air and reduce dust buildup. Lastly, clean the damaged area with a brush or vacuum to remove loose debris, providing a solid foundation for the plaster to adhere to.
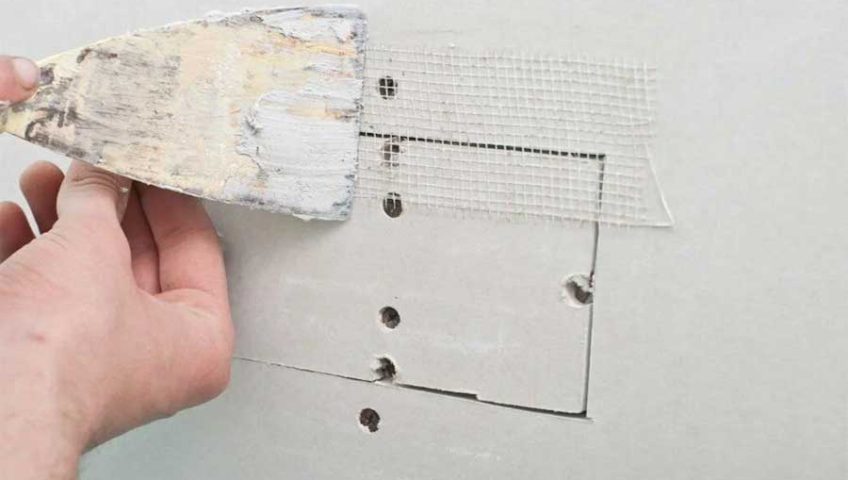
Repair Process
Applying the Plaster
Applying the plaster is a crucial step that requires attention to detail. Start by mixing the plaster or patching compound according to the manufacturer’s instructions until you achieve a smooth, consistent texture. Use your trowel to apply the plaster to the damaged area, pressing firmly to ensure it fills in all gaps and adheres properly to the underlying surface. For deeper holes or cracks, apply the plaster in layers, allowing each layer to slightly set before adding the next. This technique helps prevent sagging and ensures a more durable repair. Once the area is filled, use the flat edge of the trowel to smooth the plaster, blending it into the surrounding surface for a seamless finish.
Smoothing and Finishing
After applying the plaster, the next step is smoothing and finishing. Use a wet trowel to gently smooth the surface, eliminating any ridges or lines for a flat finish. Once dry, sand the area with fine-grit sandpaper to achieve a seamless texture that blends with the existing wall.
Aftercare and Maintenance
Effective aftercare and maintenance are paramount in ensuring the longevity of your plaster repair and overall property maintenance. Once the repair is complete and fully dry, consider applying a primer and paint to match the surrounding area, protecting the plaster from moisture and wear. Regularly inspect repaired areas for any signs of cracking or detachment, which could indicate underlying issues. Implementing a routine property maintenance schedule that includes checking for moisture, ensuring proper ventilation, and addressing minor repairs promptly can prevent future plaster damage, safeguarding the structural integrity and aesthetic appeal of your home.
Conclusion
Mastering the art of repairing damaged plaster is an invaluable skill in property maintenance, ensuring your home remains both structurally sound and visually appealing. The process, from assessing the extent of damage to applying the final touches, requires patience, precision, and the right materials. Whether dealing with minor cracks or significant holes, the key to a successful repair lies in meticulous preparation and careful application. By taking the time to properly prepare the area, select the appropriate plaster, and apply it with care, you can achieve a durable and seamless repair. Remember, regular aftercare and maintenance are just as important as the repair process itself, helping to extend the life of your plaster and maintain the overall health of your property. With these tips and techniques, you’re well-equipped to tackle plaster